Standard 2
Students will understand that volcanoes, earthquakes, uplift, weathering, and erosion reshape Earth's surface.
Objective 2 Explain how volcanoes, earthquakes, and uplift affect Earth’s surface.
a. Identify specific geological features created by volcanoes, earthquakes, and uplift.
b. Give examples of different landforms that are formed by volcanoes, earthquakes, and uplift (e.g., mountains, valleys, new lakes, canyons).

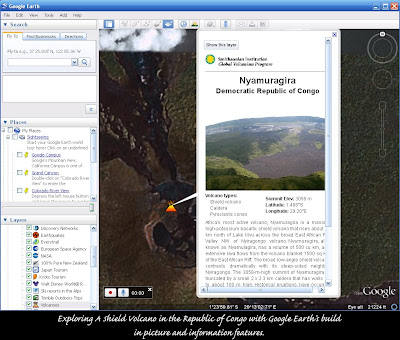
Using Google Earth 5.0 is a perfect way for students to explore volcanoes, their history, and their placements on the Earth (which happens for a reason!). Before starting the lesson, students should have basic knowledge on volcanoes: their types (cinder cone, strato, shield, etc), how they are formed, and how they have a tendency to form along plate boundaries. Once students have a basic understanding of volcanoes the fun can truly begin. Students should be paired into groups of two or three and asked to highlight two volcanoes from each of the three volcano types: cinder cones, stratovolcanoes, and shield volcanoes. This will allow children freedom to explore any volcano on Earth that fits one of the three types; this will also allow for variety in projects.

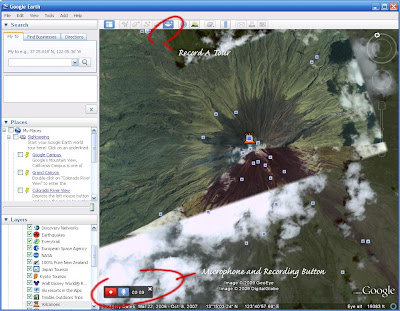
The purpose of using Google Earth for this assignment is the "Record a Tour" feature. This wonderful feature will allow your students to create a virtual tour and allow the other students to watch the tour at a later time. Before creating the actual tour, students should choose their volcanoes, the history of the volcanoes they chose, and any information they deem necessary to their tour experience. This is where imagination should be encouraged. Students may decide to do 'interviews' with the locals and ask them questions about the volcano, and/or have an interview with someone who witnessed an eruption of the specific volcano. Students may decide to describe the history of the people living in the area, the host country, etc.

Now that information has been gathered, microphones connected, and voices warmed up, students should be ready to record. Students will begin by clicking the "Record a Tour" button and will then click on the microphone. This will begin recording the tour and will record anything they say and any places they go. It will record their zooms, tilts, rolls, etc and students should be mindful of this. It may be helpful for teachers to create their own example and briefly explore the buttons and mouse actions.

Once all students have recorded their tours, teachers may decide to show them to class. All tours can be found in the "Places" menu.

Hopefully, this lesson will create some excitement in the classroom by allowing students to use technology to explore the subject of volcanoes. Children should be encouraged to be creative and truly enjoy the experience.

I never knew that Google Earth could do that. Wow!
ReplyDeleteI think that volcanoes is a fun and exciting topic! And Google Earth is the perfect tool to use. I like your clear images.
ReplyDelete